David from Scotland emailed asking how I implemented
tabbed regions on my demo site.
It's actually very easy using
Extjs.
Step 1 - Create a region template which uses static ids
<div id="#REGION_STATIC_ID#" class="tab-content">
<div class="x-fieldset-bwrap" style="padding:10px">
<div align="right" class="x-fieldset-tbar">#CLOSE##PREVIOUS##NEXT##DELETE##EDIT##CHANGE##CREATE##CREATE2##EXPAND##COPY##HELP#</div>
<div class="x-fieldset-body">
#BODY#
</div>
</div>
</div>
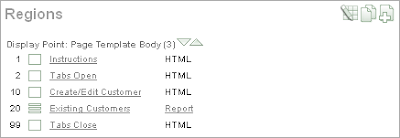
Step 2 - Create your report/form regions as usual, but assigning them a static id.
I tend to use tab1, tab2, ..., tabn - but that's a personal choice.
Step 3 - Add an opening div tag before the first tab region and a closing div tag after the last region.
<div id="pageTabs">
</div>
You can either create extra regions of type "html text" with no template,
or simply add the extra tags in your region header and region footer.
I use extra regions, so it's really obvious whats going on when I look at again in 6 months time.

When the page is generated the html will look like this:
<div id="pageTabs">
<div id="tab1" class="tab-content"> <!-- content --> </div>
<div id="tab2" class="tab-content"> <!-- content --> </div>
<!-- and so on -->
<div id="tabn" class="tab-content"> <!-- content --> </div>
</div>
Step 4 - Add the javascript magic
Here I'm showing 2 tabs, and usually include the script with the closing div tag.
<script type="text/javascript">
Ext.onReady(function(){
       var tabs = new Ext.TabPanel({
           cls: 'prism',
           applyTo: 'pageTabs',
           plain: true,
           width: 795,
           //height: 450,
           autoHeight:true,
           enableTabScroll:true,
           autoScroll:true,
           activeTab: 0,
           deferredRender: false,
           border: true,
           defaults: {layout:'fit', autoScroll:true},
           items:[
               {contentEl:'tab1', title:'Create/Edit Customer'},
               {contentEl:'tab2', title:'Existing Customers'}
           ]
           });
});
</script>
The cls: 'prism' is a customisation I use to have a blue background for the tab panel.
I'll leave that for you to work out how I did that.
As usual, the documentation on
tab panels goes into far more details.
Mark


